There’s a special kind of comfort that comes from a warm, flaky biscuit. Now, imagine splitting that biscuit open and smothering it in a creamy, peppery gravy filled with tender pieces of chicken. This isn’t your standard sausage gravy. This chicken biscuits and gravy recipe is a wonderfully hearty and satisfying twist on a classic. It feels a little fancier, but it’s just as homey and straightforward to make.
For many of us, biscuits and gravy is the ultimate weekend breakfast. But this version is so delicious and filling, it easily doubles as a fantastic weeknight dinner. You get the same creamy, savory comfort, but with the lean, familiar goodness of chicken.
This guide will walk you through making both the fluffiest buttermilk biscuits and the most flavorful chicken gravy from scratch. Let’s create a meal that will have everyone asking for seconds.
Why This Chicken and Gravy Recipe Works So Well
You might be wondering why to switch from sausage. The answer is all about flavor and texture. Chicken offers a milder, more delicate taste that lets the peppery gravy shine. It’s also a fantastic way to use up leftover rotisserie chicken or Thanksgiving turkey.
The magic of this recipe for chicken biscuits and gravy lies in its balance. The rich, savory gravy pairs perfectly with the light, buttery biscuits. Each component is simple, but together, they create something truly special. It’s a guaranteed crowd-pleaser.
According to a survey by the National Chicken Council, chicken is the most popular protein in the United States, with over 90% of households having it on hand each week. This makes a chicken biscuits and gravy recipe a practical and appealing choice for many families.
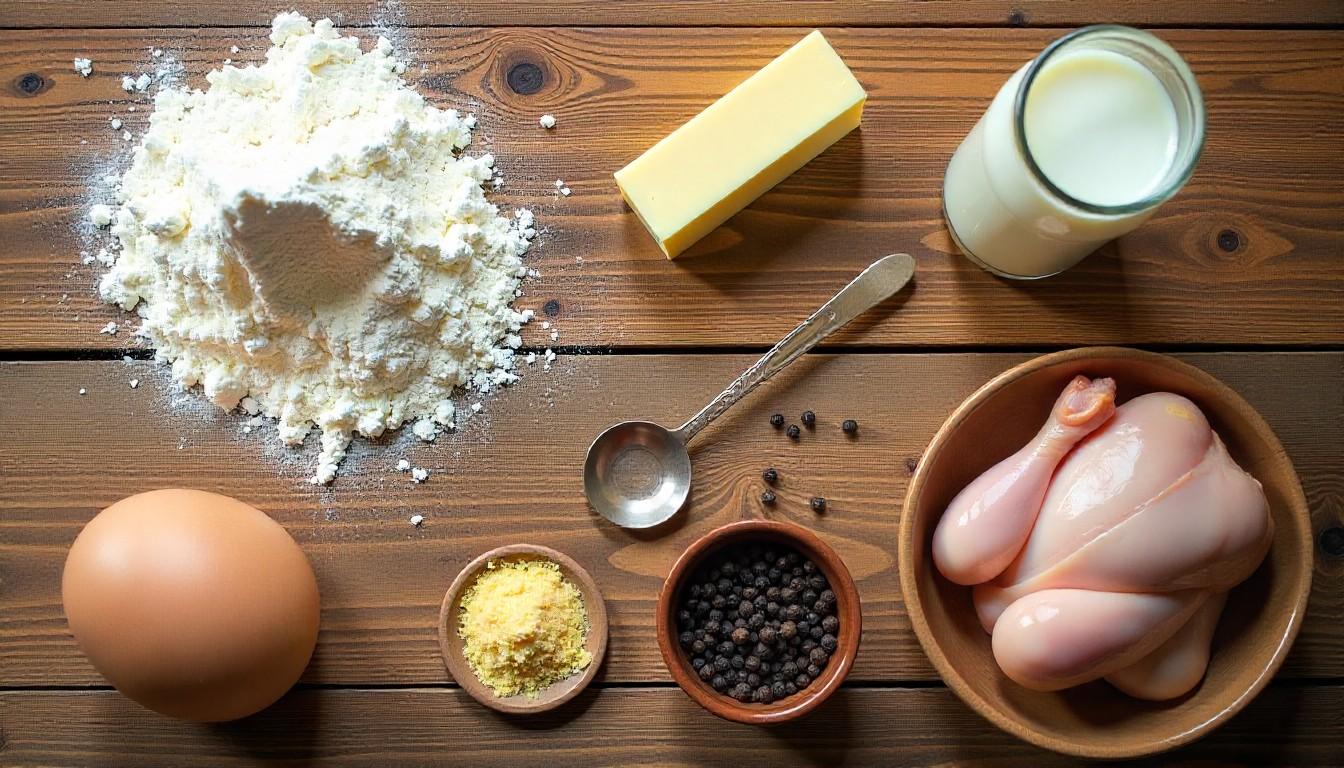
Gathering Your Ingredients for Homemade Goodness
The ingredient list is simple and broken into two parts: the biscuits and the gravy. You likely have most of these in your pantry right now.
For the Flaky Buttermilk Biscuits:
- 2 cups all-purpose flour
- 1 tablespoon baking powder
- 1/4 teaspoon baking soda
- 1 teaspoon salt
- 6 tablespoons cold unsalted butter, cubed
- 3/4 cup cold buttermilk
For the Creamy Chicken Gravy:
- 4 tablespoons unsalted butter
- 1/3 cup all-purpose flour
- 3 cups whole milk, warmed slightly
- 2 cups cooked chicken, shredded or diced
- 1 teaspoon chicken bouillon powder or a crumbled cube
- 1/2 teaspoon garlic powder
- 1 1/4 teaspoons freshly ground black pepper
- 1/2 teaspoon salt (adjust to taste)
- 1 tablespoon fresh parsley, chopped (optional, for garnish)

Crafting Your Flaky, Homemade Biscuits
Great biscuits start with a light touch. The goal is to keep the butter cold so it creates steam in the oven, leading to those perfect, flaky layers.
Step 1: Combine the Dry Ingredients
In a large bowl, whisk together the flour, baking powder, baking soda, and salt. This ensures your leavening agents are evenly distributed for a consistent rise.
Step 2: Cut in the Cold Butter
Add the cold, cubed butter to the flour mixture. Using a pastry cutter, two forks, or your fingertips, work the butter into the flour until the mixture resembles coarse crumbs with a few pea-sized bits of butter remaining. This is the secret to flakiness!
Step 3: Add the Buttermilk
Pour the cold buttermilk into the flour-butter mixture. Use a fork to gently stir until the dough just comes together. It will be a bit shaggy and sticky, that’s perfect. Overmixing is the enemy of tender biscuits.
Step 4: Shape and Cut
Turn the dough out onto a lightly floured surface. Gently pat it into a 1-inch thick rectangle. Fold the dough in half, turn it 90 degrees, and pat it down again. Repeat this fold once more. Then, pat the dough to a ¾-inch thickness. Use a floured biscuit cutter or a glass to cut straight down; do not twist; into rounds.
Step 5: Bake to Perfection
Place the biscuits on a parchment-lined baking sheet, with the sides just touching. This helps them rise up tall and straight. Bake at 450°F (230°C) for 10-12 minutes, or until they are golden brown and puffed up.
Building the Rich Chicken Gravy
While the biscuits bake, you can make the gravy. This part comes together quickly, so it’s best to have all your ingredients measured and ready.
Step 1: Make the Roux
In a large skillet or saucepan, melt the butter over medium heat. Once it’s foaming, sprinkle in the flour. Whisk constantly for about 2 minutes. You’re cooking the raw taste out of the flour, and this butter-flour mixture, called a roux, is what will thicken your gravy.
Step 2: Whisk in the Milk
Slowly pour in the warm milk while whisking continuously. This prevents lumps from forming. Keep whisking until the mixture is smooth and begins to thicken. This should take 3-5 minutes.
Step 3: Season and Add Chicken
Once the gravy is simmering and has thickened enough to coat the back of a spoon, stir in the shredded chicken, chicken bouillon, garlic powder, black pepper, and salt. Let it simmer for another 2-3 minutes until the chicken is heated through. Taste and adjust seasoning if needed.
Bringing It All Together
Split a warm biscuit in half and place it on a plate. Ladle a generous amount of the creamy chicken gravy right over the top. The gravy will seep into all the nooks and crannies of the biscuit, creating the perfect bite.
Garnish with a sprinkle of fresh parsley for a touch of color and freshness. Then, dig in immediately.
Helpful Tips and Tasty Variations
- For the Best Texture: Always use cold ingredients for your biscuits. Some bakers even freeze their butter and grate it into the flour for the easiest, flakiest results.
- Using Leftovers: This is a brilliant recipe for chicken and biscuits with gravy to use up leftover roasted or rotisserie chicken. It’s a fantastic way to reduce food waste.
- A Creamier Gravy: For an even richer gravy, you can replace ½ cup of the milk with heavy cream.
- Add Vegetables: Feel free to add a handful of frozen peas or corn to the gravy along with the chicken for an extra veggie boost.

A Meal That Feels Like Home
This chicken biscuits and gravy recipe is more than just a list of steps. It’s an invitation to slow down and enjoy the process of creating a meal from scratch. It’s about the sound of the whisk in the pan, the smell of biscuits in the oven, and the shared satisfaction of a delicious, comforting plate of food.
Whether you serve it for a lazy Sunday brunch or a simple Tuesday night supper, it’s a dish that nourishes both the body and the soul. So, preheat your oven, grab your skillet, and get ready to make a new classic.
FAQs: Your Chicken Biscuits and Gravy Questions Answered
Can I use canned biscuits for this recipe?
You absolutely can. While homemade biscuits offer an unmatched flavor and texture, using high-quality canned biscuits is a great time-saver. Bake them according to the package directions while you prepare the gravy.
What’s the best chicken to use?
This chicken and gravy recipes with biscuits is very flexible. Shredded rotisserie chicken is the quickest and easiest. You can also use diced or shredded leftover baked chicken breast or thighs. Even canned chicken (drained) works in a pinch.
How can I fix lumpy gravy?
If your gravy gets lumpy, don’t worry! Simply pour it through a fine-mesh sieve to remove the lumps. You can also use an immersion blender or a standard blender to puree it until smooth.
How do I store and reheat leftovers?
Store biscuits and gravy separately in airtight containers in the refrigerator for up to 3 days. Reheat biscuits in the oven or toaster oven to keep them crisp. Reheat the gravy gently in a saucepan over low heat, adding a splash of milk to loosen it up.
Can I freeze chicken biscuits and gravy?
The baked biscuits freeze very well. Let them cool completely, then store them in a freezer bag for up to 3 months. The gravy can also be frozen, though the texture may change slightly upon thawing. Reheat it slowly on the stovetop, whisking well.
All images in this blog are generated by using Freepik.


Leave a Reply